Monday 30 January 2012

WIP: Grapes

Ramp for the color of the grapes

Add in addition AAnoise for the "Powdery" thingy 

Result

Reference picture

WIP EFFECTS SHADER: Snowy mountain

Spent a couple of days doing the terrain, followed the step by step tutorial. Which is around 21 mintutes, managed to get the terrain to work after encountering some errors.  Thank goodness. ._.

Height map for the mountain
Notice the gradient of black and white, acts like a bump map.
One have to make sure that the resolution of the height map is correct.


Using an image to extrude the grid

Using aanoise and veins to give the mountain look. 

 X and Y axis,  to drive the moution


Followed online tutorial (21 min)


Links:
http://www.youtube.com/watch?v=ua0pEHzSuYo
http://www.youtube.com/watch?v=E0FFEvzIPMg
http://www.youtube.com/watch?v=mFTAAC1HCck&feature=related


Research on Shader!!


Source:
http://blenderartists.org/forum/showthread.php?230606-Mountain-landscape

A blender Artist did a snow mountain below:


1337 shader. T.T

Very interesting, a litttttttttlllllllleeee like houdini, more like apple shake tho.
He mixed two colors, using a ramp for the different tints of brown i suppose.

Impressive (:


What i need: 

Noise: Pattern for the snow
Base color:  Grey
Secondary Color: White
Ramp to adjust the color from one color to another (maybe)

Plan: 

Mix two color together. 
Noise to drive the pattern
Ramp to control the range of color
Displacement
Dump

Time check: 2.58am T.T 

WIP: Grapes

Reference Pictures:


WIP:

. Model Downloaded
. SSS Added
. Color range: 60% done

Base Color


SSS
Render:


Friday 20 January 2012

Pixar Shader

Shading Grapes - the basic model

A bunch of grapes is a good case study for our components of contributing illumination. For the shader we used tinting of scatter (with warmth) and lightly-patterned surface diffuse color, allowing more translucency to dominate over the diffuse. Each grape was offset individually from the bunch by a random color shift in hue and value. We also used a subtle diffuse blur and a sharp reflection. With this, the elements were in place for lighting to create an appealing image.


Souce: https://renderman.pixar.com/products/whats_renderman/showcase_ratatouille.html

Monday 16 January 2012

WIP: Research on Grapes

Here's what someone did in maya. 


To see the subsurface scattering in effect, I placed two spotlights, one at the back and one at the front of the bunch of grapes. It took me quite some time to get the look right as this is my first time doing subsurface scattering. But in the end, this result satisfied me for the time being. Here's the shading network:


Note to self:

His maya network consist of a base color and 3 different noises: 

Brownian
Stucco
AAnoise(i suppose)

Essentials: 

SSS
Spot Lights 

Also, I have downloaded some grapes for this shader assignment.


Will work on the composition of the grapes too. 


Also found a tutorial of the making of grape, from modeling in maya to the shading in Blender. 

This was the end result.


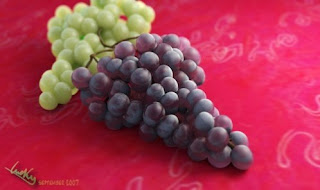
I observed some real grapes and searched for photos with google. I’ve found out there are two main shaders that could do the trick:
A reflective shader, with SSS, because when you put a light behind grapes you can easily see the light going through and it turns the grapes into a red color. The Fresnel effect is valuable on such a reflective shader, i set it to a high value (2.2) to be more realistic. And on top of that, a dust shader, without reflections nor specular to make the grapes soft and dusty.
Reflective shader:
Blurry reflections (if Glossiness < 1) would even be better, but is slower to render.
Dust shader:
The dust shader is made with two clouds textures.
First texture channel: Cloud. Noise Depth = 6. It looks like this:
Nor is activated for bump mapping and Alpha to leave transparent spaces (where pixels are black) so that the reflective shader is visible under this one. Consenquently, Alpha value of this material = 0.
Second texture channel: stucci to simulate the dust noise.
Ramps are useful to enhance the dusty effect, thanks to the ‘normal’ input (useful to create silky material and micro-hair, like apricot, peach skin, etc…):
I connected the 2 materials with the nodes (a simple “mix” node did the trick):


The lighting isn’t complicated, one area light on the right side of the picture (with ten samples to have smooth shadows), plus plain Ambient Occlusion (13 samples). Yes, it was not too long to setup!

Blurry Reflection 

Its dust material is made up of two cloud textures. T.T 
Ramp to enhance dusty effect. 


SSS TIPS:

Some dude did this in maya... 

http://vimeo.com/8015512

Fluffyyyyyyyyyyyyy Clouds

Learnt how to do the formation of cloud using a curve 


Reference: 


My Final Outcome: 


Monday 9 January 2012

SSS- practical & chosen effects and Organic Shader for Assignment two


Orange Juice

v001: 
\

v002: 


Milk


Orange:


Milk:


Chosen reference img for assignment two:


Other People's work:

http://vimeo.com/31422564


And effects:
Snow Shader